CAT control serial port for Xiegu 6100 in JS8Call on macOS 10.14.6

(Long title, but had to cover all the bases)

For my radio, it was `/dev/cu.usbmodem53620077003`. Trying different order of operations (plug radio first, then start JS8Call vs start JS8Call, then plug radio) may have been what I needed to get the right serial port to show up in the list. Below is a screenshot of all the settings that seem to work.

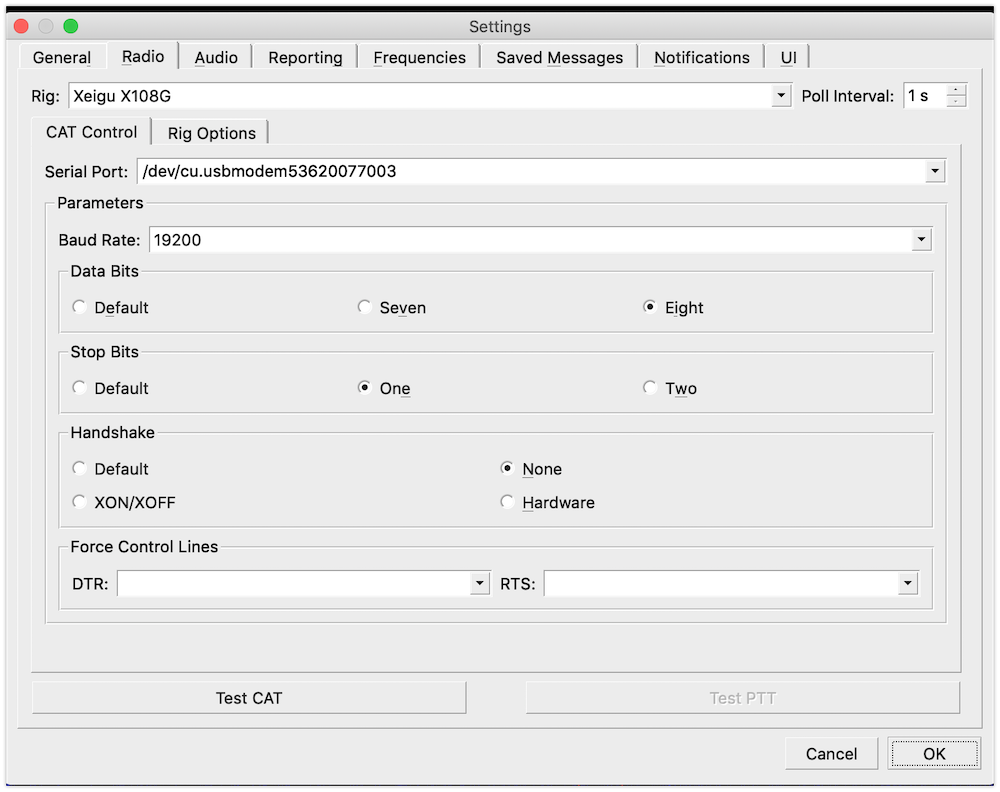
Following this post by HB9TXB Branko, I did also check the list of serial ports using this command in the terminal: `ls -lrt /dev/tty*`.

Delete Windows files that match a filename pattern with “Everything”

Everything is a tool I use daily to replace Windows search, which is painfully slow. In addition to indexing files by name, it allows you to run normal file operations on the resulting list.

I ended up with thousands of files starting with “._” after a OneDrive migration. The eventual solution (after looking for CMD commands) was to just use Everything to search, select all the files, right-click, and select “Delete.”

Screenshot of Everything and a dialog box asking me if I want to delete files.

Winlink Express 1.6.6.0 and Icom IC-7300

Just like everyone else, I’m going to put down the settings that work for me, but they might not work for you. VARA was easier to get working with appropriate CAT control (changing frequency and keying PTT), but ARDOP was a pain. Maybe this will help someone else.

These settings are DIFFERENT than ones shown by SA7SKY here (at least, that’s where I found a copy). Looks like they were using Winlink Express 1.5.11.3. The images below are from 1.6.6.0.

With these settings, you cannot have flrig running at the same time, because flrig and Winlink are trying to use the same COM port. I’m still working on a solution to this.

Above, note that “Enable RTS” and “Enable DTR” are checked (differs from SA7SKY). Baud is set to match my IC-7300.

Below, the ARDOP_Win_Virtual_TNC window opens when you start the ARDOP session, but it is usually minimized by default.My settings above match SA7SKY.Above, “Use Radio’s Internal Sound Card” is checked (you’ll get an “are you sure” popup if you choose the Icom 7300 and don’t check this box), SA7SKY does not have it checked.

Uploading big files to Castopod on YuNoHost

Find PHP version being used:

> matt@example:/etc/php$ tail ynh_app_version
> castopod:8.0

Update `memory_limit` in `sudo nano /etc/php/8.0/fpm/php.ini`

Restarted PHP 8 service, getting `504 Gateway Time-out nginx` now. Progress?

Then set `client_max_body_size` in here to 700 rather than 600:
`matt@example:/etc/nginx/conf.d/castopod.example.net.d$ sudo nano castopod.conf`

Then set `max_execution_time` to 90 at `sudo nano /etc/php/8.0/fpm/php.ini`

Restart nginx and PHP services (I used https://example.net/yunohost/admin/#/services).

WSJT-X Setup on macOS

I may add to these notes, but a key one was to make sure to give WSJT-X access to the microphone, even when using a USB cable to control the rig. Thanks to K3DCW for the tip.

I presume that you have a checkmark in the box labeled “PortAudio” next to the USB Audio CODEC device selectors. If so, then the only other thing that I can think of is that you haven’t given macOS permission to access your “microphone.” Many of these programs see/treat that USB Audio CODEC as a microphone input and failing to give it access to your “microphone” will cause it to not hear a thing. Go to the Security & Privacy pane and make sure that Fldigi has access to the microphone.

I also have iShowU Audio Capture installed (for OBS screen recording), which I thought might have been the problem. Here are my current working audio settings (Audio Midi Setup).

The rest of the settings described here work out well for connecting the IC-7300 and my MacBook Pro.

To get the gain right in the software, I used the RF Gain knob on the IC-7300. There is a way to adjust this in the settings but I can’t find it at the moment. It’s the ACC/USB AF Output Level setting under MENU>SET>Connectors (make sure you scroll up and down the menu items as needed). All suggestions are to get the bar in WSJT or JTDX to about 30 dB.

Labeling minimum and maximum values on a fill color guide in #rstats #ggplot2

This took me a while to understand, and even though I think this should be built in somewhere, I ended up with the following function:

# Function to show min and max values on fill color bars.
# Inspiration from https://stackoverflow.com/a/60732101/2152245
# original_func should be something like "scales::breaks_pretty(3)"
breaks_min_max <- function(original_func) {
    function(x) {
        original_result <- original_func(x)
        breaks <- c(min(x), 
                  original_result, 
                  max(x))
breaks_sort <- sort(breaks)
# If values are too close, drop one of them
close <- diff(breaks_sort) < 1
breaks_sort <- breaks_sort[!close]
breaks_sort
    }
}

Note the very rough method of determining when labels will be too close together. This would need to be modified if working with negative numbers or values that are all decimals.

In use:

ggplot(mtcars,
aes(x = mpg,
y = disp,
color = qsec)) +
geom_point(size = 5) +
scale_color_continuous(breaks = breaks_min_max(scales::breaks_pretty(4)))

Result:


Update 2021-09-28:

If you have a log scale, this will also work if you use breaks_log(). Example below. This seems to be sensitive to the number of breaks you set; for the example below, 4 doesn’t work (the top and bottom values aren’t labeled), but 6 does.

ggplot(mtcars, aes(x = mpg, y = disp, color = qsec)) + 
geom_point(size = 5) + 
scale_color_continuous(trans = "log10",
breaks = breaks_min_max(scales::breaks_log(6)))

List of #APRS Projects (and interesting alternatives)

I’ve expanded my search beyond what I introduced in APRS tracker/viewer build concept. Here I will attempt to organize projects some other folks have put together.

This has been sitting in draft mode for several weeks, but I’m pushing it out now and hoping to add more as I learn.

Exploring genealogy with R: readgedcom and tidygraph

My code is an absolute mess right now, but here’s a fun plot showing everyone in my family GEDCOM. With so many people, it’s hard to visualize all of them at once, and most software provides one or the other of a descendant tree or an ancestor tree.

Colors on this plot show whether a person is a terminal ancestor (no parents) or terminal descendant (no children). You can also tell that I don’t have the graph (connections between people) set up properly, because I don’t have that many unrelated individuals in this GEDCOM (at least, I shouldn’t). Overall I think this is a good start and eventually I can end up with a poster.

network plot with lots of circles and arrows
Red = terminal ancestor, green = terminal descendant, blue = neither.

Counterpoint API (quick notes)

Looks like first you would grab the counterpoint ID from here: https://counterpointapp.herokuapp.com/api/v1/counterpoints
EERC is counterpoint_id 606. Could select by bounding box (lat/long) too. This includes a list of counts (just labeled “id”) but no actual counts, so you could do time/date collection stat comparisons from there as well.
Then you can pull up actual counts from https://counterpointapp.herokuapp.com/api/v1/counterpoints/606 where the counterpoint_id is named at the end. This gives you a list of counts, including data.
It looks like minutes start/end on the second that the count was started, so aggregation by minute (not second) should be used.
It looks like minutes without data are excluded, e.g. no 12:51:52 minute is included here (EERC 606):
{"id":281510,"count_session_id":18223,"timestamp":"2016-06-21T12:51:56.000Z","bike_generic":0,"bike_adult":0,"bike_child":0,"bike_baby":0,"bike_cargo":0,"bike_child_trailer":0,"walk_generic":0,"walk_adult":0,"walk_child":0,"walk_stroller":0,"walk_disability":0,"walk_skateboard":0,"walk_visually_impaired":0,"walk_physically_impaired":0,"vehicle_personal":2,"vehicle_car":0,"vehicle_semi":0,"vehicle_moto":0,"vehicle_transit":0,"vehicle_oversized":0,"objectId":null,"gender_m":0,"gender_f":0,"gender_o":0,"onePerson":0,"twoPerson":0,"threePerson":0,"fourPlusPerson":0},{"id":281511,"count_session_id":18223,"timestamp":"2016-06-21T12:53:56.000Z","bike_generic":0,"bike_adult":0,"bike_child":0,"bike_baby":0,"bike_cargo":0,"bike_child_trailer":0,"walk_generic":0,"walk_adult":0,"walk_child":0,"walk_stroller":0,"walk_disability":0,"walk_skateboard":0,"walk_visually_impaired":0,"walk_physically_impaired":0,"vehicle_personal":5,"vehicle_car":0,"vehicle_semi":0,"vehicle_moto":0,"vehicle_transit":0,"vehicle_oversized":0,"objectId":null,"gender_m":0,"gender_f":0,"gender_o":0,"onePerson":0,"twoPerson":0,"threePerson":0,"fourPlusPerson":0}

Resetting read_only in Elasticsearch

Rather than messing with curl, I went the long way and installed Kibana. It takes a little while to unzip. Run it in a very similar way to Elastisearch (bin\kibana.bat). Go to http://localhost:5601/app/kibana#/dev_tools.

Paste in the solution from here:

PUT /<yourindex>/_settings
{
  "index.blocks.read_only_allow_delete": null
}

You may have run into this because you are close to the disk space limits. Rather than modifying those through Kibana, you can add them directly into elasticsearch\config\elasticsearch.yml.